最高の「いってきます」体験を支える技術 というタイトルで発表した
スライド
概要
Misoca 秋のLT大会 - connpass で我が家のスマートホーム事情を発表してきた。
- ルンバを定型アクションに組み込む方法
- 家電ではないものを仮想的な家電にして、定型アクションに組み込む方法
みたいな話ができて個人的には満足している。
VSCode で Ruby の syntax error を表示する
何に困っているか?
普段 Ruby をVSCode で書いている。 Ruby 拡張 をインストールしているのに、Ruby の syntax error が表示されない気がする。 調べてみたら、設定が必要らしいので、その設定をメモする。
環境
VSCode の設定
settings.json
{
    ...
    "ruby.lint": {
        "ruby": {
            "unicode": true
        }
    }
}
"unicode": true が無いと Ruby コードの中に日本語が書かれているとエラーになってしまう。
他にも
rubocop や reek の設定ができるっぽいが、なんか重くなっても嫌なのでまずは syntax のみ。
### 設定完了

syntax error が通知されるようになった!
RSpec の have_attributes マッチャがリテラルとマッチャを両方指定できる仕組み
have_attributes マッチャ
RSpec に have_attributes というマッチャがある。
it { expect(10.to_s).to eq("10") }
it { expect(10.positive?).to eq(true) }
と書くところを
it { expect(10).to have_attributes(to_s: "10", positive?: true) }
と書くことができる。
一つのインスタンスに対して複数の属性をチェックする時に読みやすくできるというメリットがある。
have_attributes の不思議
実は have_attributes は
it { expect(10.positive).to be_truthy }
を
it { expect(10).to have_attributes(positive?: be_truthy) }
と書くことができる。 ハッシュのバリューに「マッチャ」を書くことができるのだ。 つまり have_attributes はハッシュのバリューに「マッチャ」と「リテラル」の両方を書くことができる。 これは結構不思議だと思ったので、RSpec のソースコードを読んでみた。
ソースコードを読む
この中でハッシュのキーとバリューはそれぞれ value_match? で比較される。
def actual_has_attribute?(attribute_key, attribute_value)
  values_match?(attribute_value, @values.fetch(attribute_key))
end
value_match? メソッドは Support::FuzzyMatcher.values_match? を呼び出す。
def values_match?(expected, actual)
  expected = with_matchers_cloned(expected)
  Support::FuzzyMatcher.values_match?(expected, actual)
end
この FuzzyMatcher.values_match? メソッドが、expected と actual を == で比較し、不一致だったら更に matcher.match? で比較するという仕組みになっている。
 def self.values_match?(expected, actual)
   if Hash === actual
     return hashes_match?(expected, actual) if Hash === expected
   elsif Array === expected && Enumerable === actual && !(Struct === actual)
     return arrays_match?(expected, actual.to_a)
   end

   return true if expected == actual

   begin
     expected === actual
   rescue ArgumentError
     # Some objects, like 0-arg lambdas on 1.9+, raise
     # ArgumentError for `expected === actual`.
     false
   end
 end
だから have_attributes にはマッチャもリテラルも両方書ける!
まとめ
たまにはソースコードを読んでみると面白い。
超簡単に stylelint を試す
stylelint
CSS/SCSS 用の Lint ツールとして stylelint がある。 手元にあるプロジェクトの CSS/SCSS を LInt ツールにかけたいが、環境構築にあまり時間をかけたくない。
特に
- プロジェクトの構成を変更したくない、stylelint の導入のためだけに package.json の導入とかはしたくない
- ルールを細かく設定したくない。なるべくデフォルトでいい感じにして欲しい
というワガママを叶えたまま、手元の CSS/SCSS をチェックする方法を調べてみた。
環境
- stylelint@10.1.0
- stylelint-config-standard@18.3.0
設定手順
まずは stylelint と stylelint-config-standard をグローバルにインストールする。
$ npm i -g stylelint stylelint-config-standard
次にルールファイルを作る。これもグローバルに設定する。
$ vim ~/.stylelintrc
{
  "extends": "stylelint-config-standard"
}
たったこれだけで stylelint コマンドが実行できるようになった。
実行手順
stylelint に CSS/SCSS ファイルのパスを渡すだけでできる
$ stylelint app/assets/stylesheets/**.scss

app/assets/stylesheets/application.scss
 10:1   ✖  Expected empty line before rule                           rule-empty-line-before
 16:16  ✖  Expected single space after "{" of a single-line block    block-opening-brace-space-after
 16:41  ✖  Expected single space before "}" of a single-line block   block-closing-brace-space-before
 17:22  ✖  Expected single space after "{" of a single-line block    block-opening-brace-space-after
 17:35  ✖  Expected single space before "}" of a single-line block   block-closing-brace-space-before
 17:35  ✖  Expected a trailing semicolon                             declaration-block-trailing-semicolon
自動で修正まで行う場合には --fix オプションを渡す。
$ stylelint app/assets/stylesheets/**.scss --fix
まとめ
簡単に stylelint でチェックできるようになったので、自分の書いた分くらいはチェックしてからコミットできるようになった。 ちゃんとやるならルールファイルをリポジトリにコミットしておくのがよいと思う。
YouTube Data API v3 でチャンネルの動画 ID を全て取得する際には PlaylistItems API を使う
やりたいこと
Google Apps Script 上で YouTube Data API v3 を使って、動画の情報を取得している。 特定のチャンネルにアップロードされた動画全ての ID を取得したかったが、Search API を使って書いたら歯抜けになってしまい、すべての動画 ID が取得できなかった。 このハマりについてまとめる。
Search API を使ったバージョン(うまく動かない)
最初は Search API を使って以下のようなコードを書いていた。
var nextPageToken = null;
do {
  var response = YouTube.Search.list('id', {
    channelId: 'UCXcjvt8cOfwtcqaMeE7-hqA',
    type: 'video',
    maxResults: 50,
    order: 'date',
    pageToken: nextPageToken
  });
  for (var i = 0; i < response.items.length; i++) {
    var videoId = response.items[i].id.videoId;
     // do something with videoId
  }
} while(nextPageToken);
channelId を指定し、検索クエリなしで書いていたので、すべての動画が含まれると思っていた。
response の中に含まれる、pageinfo.totalResults にも全動画の数が含まれていたので、まさかページネーションをしてもすべての動画が含まれていないとは思わなかった。
PlaylistItems API を使ったバージョン (うまく動く)
どうやら PlaylistItems API を使うと、抜けがなく動画を取得できるらしい。 コードにすると以下のような感じ。
チャンネルのすべての動画が含まれるプレイリストの ID は Search API などを使って特定しておく必要がある。
var nextPageToken = null;
do {
  var response = YouTube.PlaylistItems.list('id,contentDetails', {
    playlistId: 'PLRiGv_zZZiw9dppLgE2QfTcj0uDLYTNEk',
    maxResults: 50,
    order: 'date',
    pageToken: nextPageToken
  });
  for (var i = 0; i < response.items.length; i++) {
    var videoId = response.items[i].contentDetails.videoId;
    // do something with videoId
  }
} while(nextPageToken);
まとめ
YouTube Data API を使って、チャンネルにアップロードされた全ての動画の情報を取得するためには、Search API ではなく、PlaylistItems API を使うこと。
参考 URL
VSCode で Ruby のカバレッジを表示する
何をしたいか
RubyKaigi 2019 に行ってカバレッジに対しての意識が高まっているので、VSCode で Ruby のカバレッジ(どの行が実行されて、どの行が実行されなかったか)を表示したい。
VSCode 側の設定
Coverage Gutters という拡張を入れる。 Ruby は対応していなさそうだけど大丈夫。
プロジェクト側の設定
diff --git a/Gemfile b/Gemfile
index 2139148..b02f0e1 100644
--- a/Gemfile
+++ b/Gemfile
@@ -49,6 +49,8 @@ gem 'gretel'
 gem 'chart-js-rails'

 group :development, :test do
+  gem 'simplecov'
+  gem 'simplecov-lcov'
   # Use sqlite3 as the database for Active Record
   gem 'sqlite3', '~> 1.3.6'
   # Call 'byebug' anywhere in the code to stop execution and get a debugger console
忘れずに bundle install しておく。
次に spec_helper.rb に simplecov の設定を追加する。
diff --git a/spec/spec_helper.rb b/spec/spec_helper.rb
index ce33d66..6dc7db9 100644
--- a/spec/spec_helper.rb
+++ b/spec/spec_helper.rb
@@ -93,4 +93,13 @@ RSpec.configure do |config|
   # as the one that triggered the failure.
   Kernel.srand config.seed
 =end
+
+  require 'simplecov'
+  require 'simplecov-lcov'
+  SimpleCov::Formatter::LcovFormatter.config do |c|
+    c.single_report_path = 'coverage/lcov.info'
+    c.report_with_single_file = true
+  end
+  SimpleCov.formatter = SimpleCov::Formatter::LcovFormatter
+  SimpleCov.start 'rails'
 end
カバレッジを表示する
$ bundle exec rspec
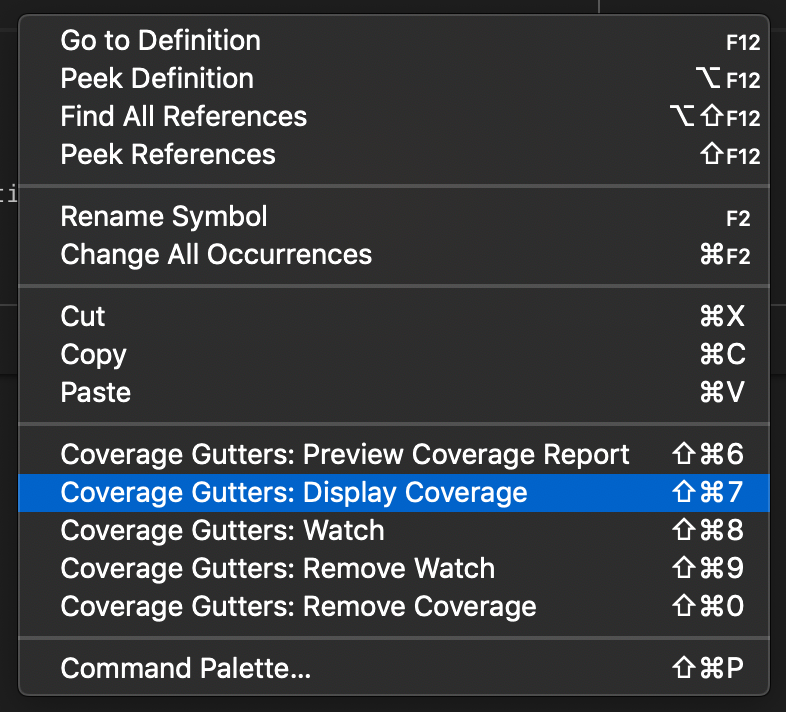
ファイルを開いて、右クリックメニューから「Coverage Gutters: Display Coverage」をクリックする。

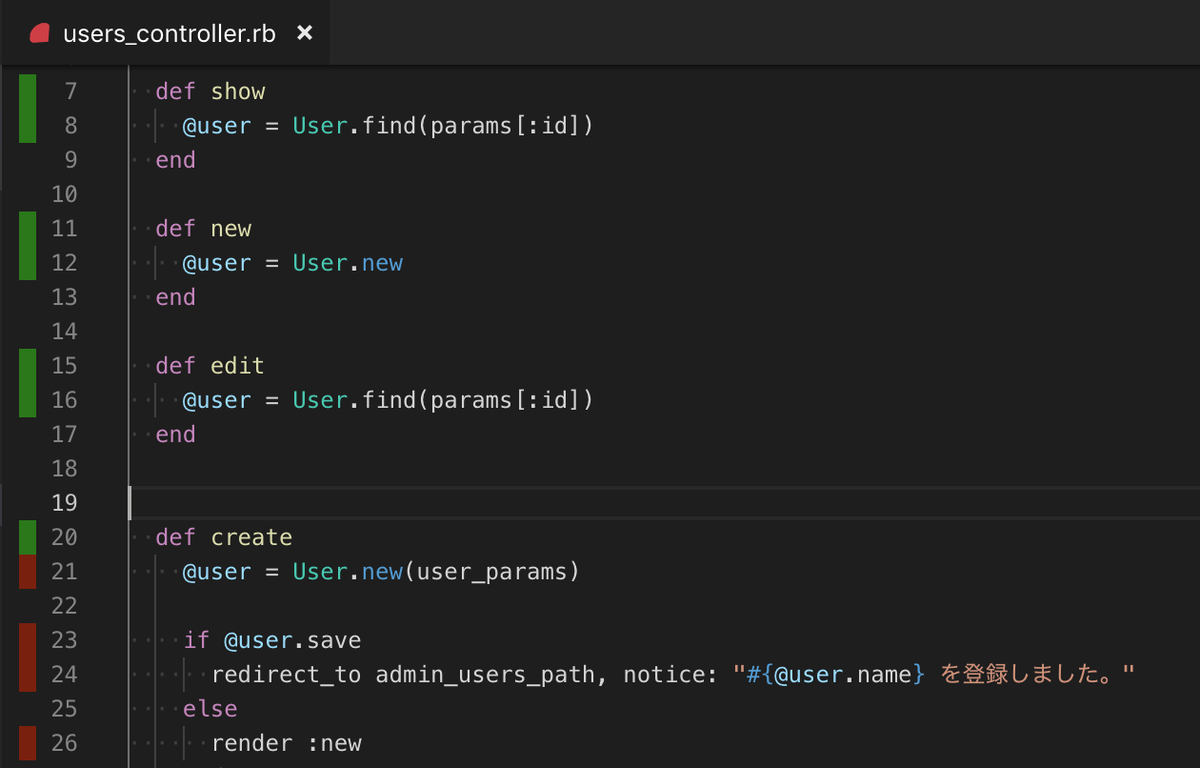
どの行が実行されてどの行が実行されていないかが表示される。

まとめ
簡単に最高の結果を手に入れた。
macOS で 'pg' を含む Gemfile を bundle install する方法
という記事を6年前に書いたが、久しぶりにやったら動かなかったのでメモ。
環境
手順
Postgres.app をインストールする 素直に /Applications/ 以下にコピーする
Gemfile があるディレクトリで以下のコマンドを実行
$ bundle config build.pg --with-pg-config=/Applications/Postgres.app/Contents/Versions/latest/bin/pg_config
$ bundle
前の記事と比較として bundle config に渡す pg_config のパスが変更になっている。
まとめ
Mac OS X が macOS になっていたり Ruby が v2 になっていたり、Bundler が v2 になっていたり、時の流れを感じる。